
DIY Cardigan Ideas
There's no denying it, Lolita brand cardigans and boleros are absolutely adorable, but unless you hunt them down second hand, they're also quite expensive. Very often they are quite simple too, to the point where you think that you could do it yourself. And you can with a suitably classic offbrand cardigans nabbed at a sale or from charity shops, so below are a few of my own cardigans that I managed to get cheaply and lolify them.


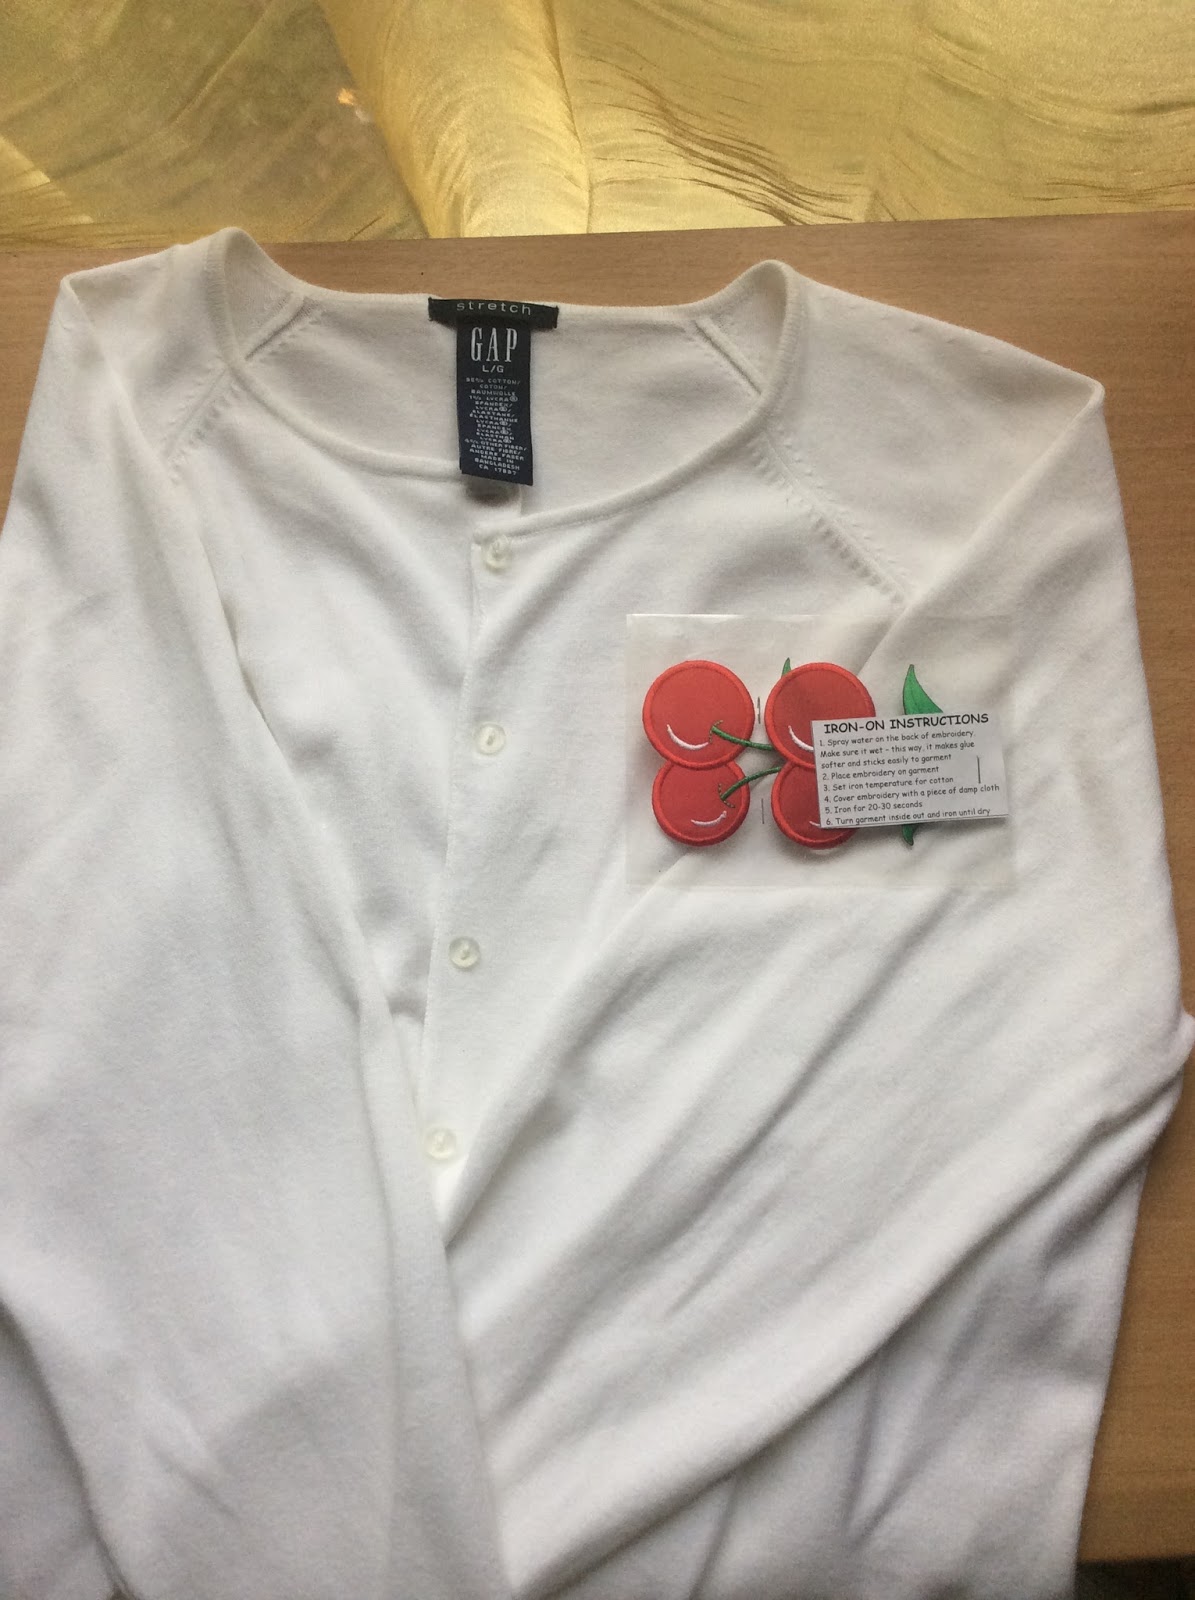
You see the instructions I followed on the Things you will need photo. I have only altered them so far as to dab the back of the patch with wet fingers rather than spray (as I have nothing to spray the water with), and ironing the patch three rather than two times: first over a damp towel, second on the back and third on the front again, but without the towel.
Regardless of how may patches you use, one, two or more, it's always a good idea to lay them out on top of your garment first to see if they'll look good and if they're even. If you can, like in case of patches ironed on around the neck/shoulder area, you can place them on the cardigan while you wear it, to better see where will they sit on the finished product.
The instructions don't specify how to wash the garment after adding the patch, so I did a quick research online. What I found there is that garments with iron on patches should be washed inside out on a gentle, cold cycle, they shouldn't be tumble dryed, and that they shouldn't be washed within the first three days or so of putting the patch on. I also read that if they begin to peel of, repeating the ironing process should fix that, but I am yet to try any of the above.

The two cherry patches really pop against the white cardigan. I wish that they were mirror images of each other, but even without that they look good. I could use that cardigan for some of my 1950s inspired outfits just as easily as I could for Lolita, which indeed makes for a very versatile end product.
Total cost of making: depends on the cost of your cardigan and the patches. This one cost me £8.27 total (and mostly due to the price of the patches and shipping on the cardi!)

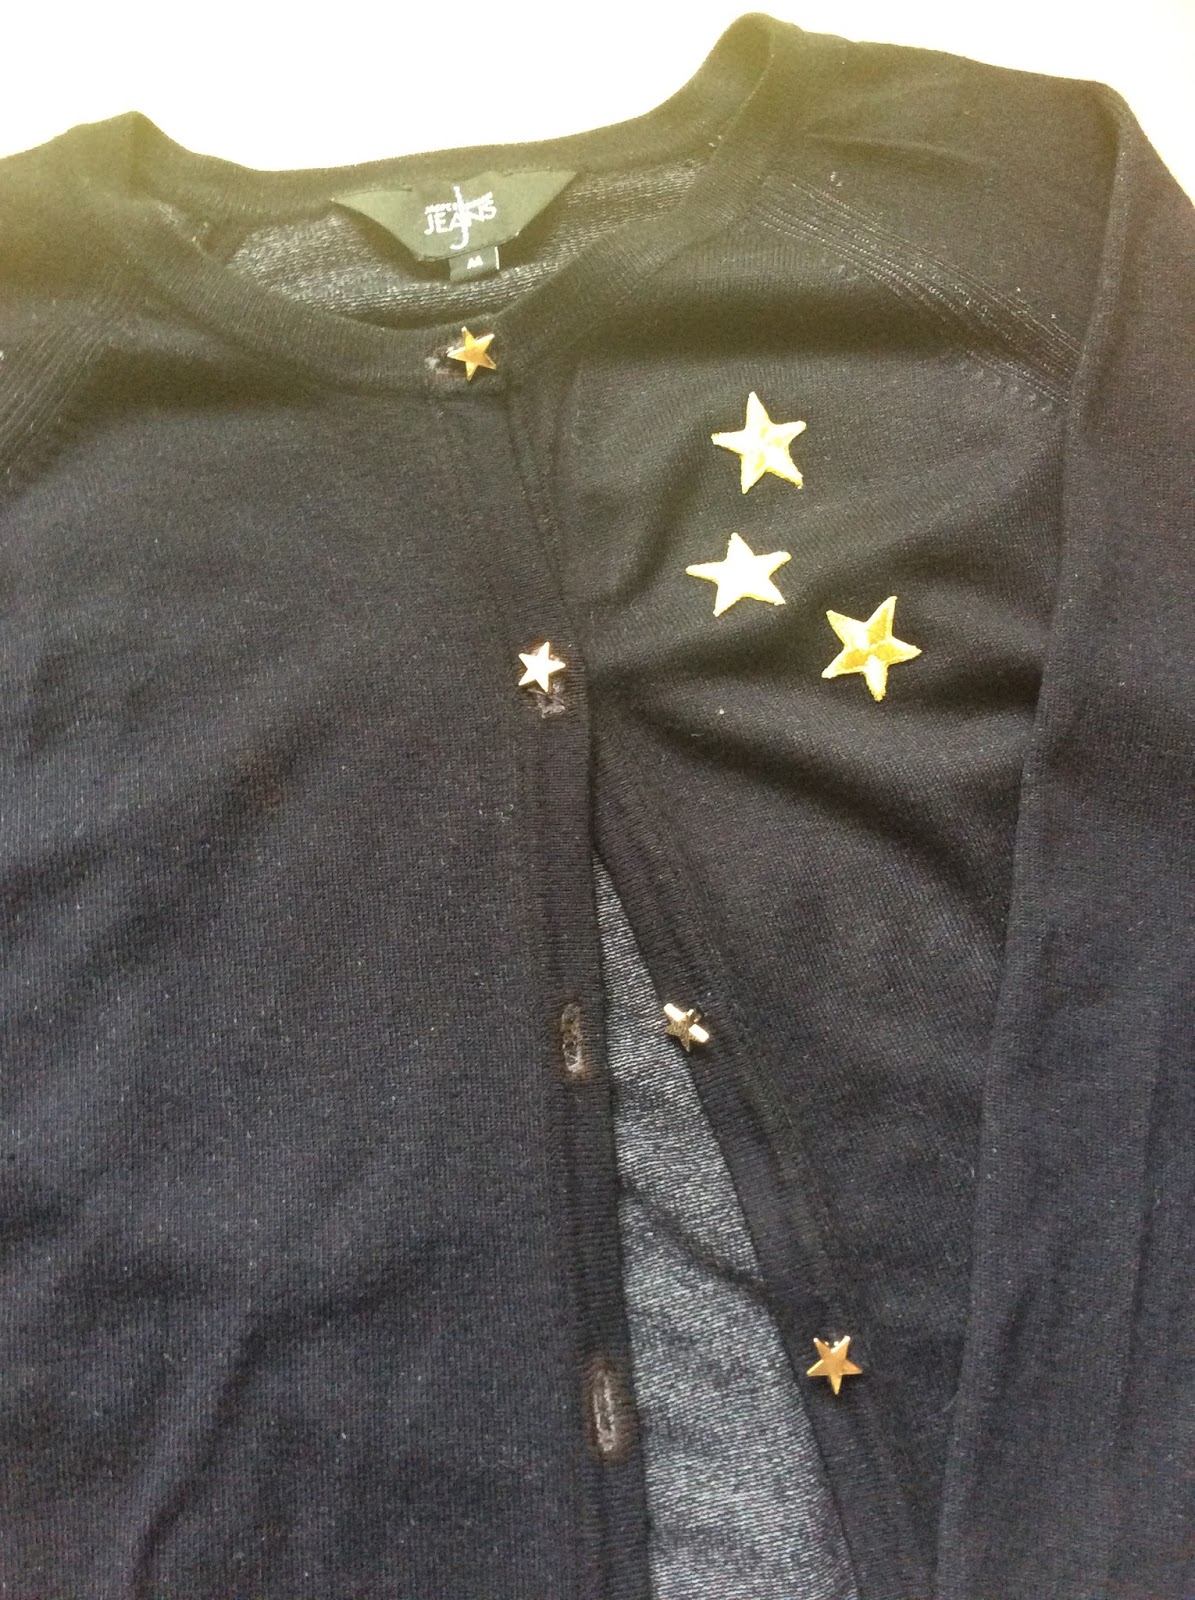
 Measure the diameter of buttons that are on the cardigan before buying new buttons. Unless you're a skilled enough seamstress to adjust the button holes yourself, you must get buttons which will fit through the existing hole without trouble. If your buttons are an odd or awkward shape to put through a button hole (e.g. stars or teddy bears), it may be worth buying ones that are slightly smaller than the original ones. Once your new buttons arrive, or if you're able to take the cardigan to the craft shop with you, you can always check if the button would fit. In my case, although the buttons are wider than the original ones, they're also narrower, which meant that I would be able to fasten them up.
Step 2
 Remove the buttons from the cardigan. Be careful to only cut the thread and avoid cutting though the cardigan itself. As you remove the buttons, you can mark where they originally were, if you're worried that you won't be able to find that same spot again. If you do that then ensure that you use something easy to wash off (like sewing chalk) or make a mark small enough that it will be hidden under the new button (in which case most things will do). Alternatively, you can remove the old buttons and attach the new ones one by one, either whilst keeping the original thread in place or whilst still able to see/remember where the old one was placed.
Step 3
 Sew your new buttons on. This is the part where you want to take your time, especially if you're not particularly experienced at that, so sit comfortably in a well lit room and do it at your own pace. Ensure that your needle is the right thickness for the button as well as your hands, and that you're using thread in a colour matching the cardigan as closely as possible. Even if you don't sew a lot, you could get a cheap sewing kit which already comes with a variety of colours, but generally black will work on most dark colours and white – on most light ones. When sewing the buttons on, watch out for thread tangling and make sure that in the end it's attached securely, so that it will last.

Changing the buttons on the cardigan not only gave it a more Lolita feel, but also lifted the whole thing overall. Before it seemed a bit dark, dull, a little washed out, but with the new buttons it looks almost brand new again. While in the sunlight the photo came out looking like the cardi was more pastel than it is in real life, the colours go together just as nicely, and I know that I'll get plenty of use out of this one.
Total cost of making: about £8.65 (again, the cardigan was the pricey part here).

 Similarly to Method 1, this is a "follow instructions on the packet" process. Every dye and dye brand will work a little differently, and ignoring their instructions may result in you damaging the cardigan or even your washing machine.
In my case, the cardigan I started out with is a rather awful shade of pale green. What I'd love to have is a rich navy one instead. When dyeing fabrics, remember that the same colour combination rules apply as everywhere else: for example, if you're trying to dye a yellow item blue, it can come out green and so on. So to make sure that I get the result I'm after, I used a pre dye product which stripped the cardigan off that horrible colour. If yours is white or offwhite, or if you're not worried about the colours mixing and creating something new and unwanted, simply proceed to the next step.

 Step 2
Now we get to the dyeing part. With Dylon there is a certain amount of dye that you need minimum per your item’s weight to achieve the full colour. However unless they're thick, heavy cardigans, one packet should be enough. So once the cardigan came out all stripped of that terrible green (except for thread around the buttonholes), I followed the instructions on the dye and whacked it back to the washing machine again.

As you can see, I did more to this cardi than dyeing it. Nonetheless, just dyeing made a world of difference. As it turned out, I probably didn’t need the colour remover, but I’m still pleased with the result. The thread around the buttonholes wouldn’t dye because it’s nylon, so I used a permanent black marker to cover that up – if you're skilled enough then by all means use less amateur means. Hopefully that won’t run in the wash.
Total cost of making: £16.33 just for the dyeing part (Dylon's products aren't cheap, around £6.50 per dye and just under £6 for the pre dye, however, they are quality, and I didn't want to skimp on that); £19.02 including the new buttons and iron on patches.

Method 1: Iron on Patches
Things you will need
- Cardigan of your choice
- Iron on patch(es), however many you need for your project
- Iron (not pictured)
- Ironing board (not pictured)
- Bowl of water (not pictured)
- Little towel, damp (not pictured)
Instructions
 |
| Step 1: laying out the patches. |
 |
| Step 4: cover patch with damp cloth and iron for 20-30 seconds. |
 |
| Step 6: turn cardigan inside out and iron until dry. |
Finished product

The two cherry patches really pop against the white cardigan. I wish that they were mirror images of each other, but even without that they look good. I could use that cardigan for some of my 1950s inspired outfits just as easily as I could for Lolita, which indeed makes for a very versatile end product.
Total cost of making: depends on the cost of your cardigan and the patches. This one cost me £8.27 total (and mostly due to the price of the patches and shipping on the cardi!)
Method 2: Changing Buttons
Things you will need

- Cardigan of your choice
- Buttons, as many as you need for that cardigan (plus optional spares)
- Ruler
- Scissors
- Needle
- Thread in a matching colour
- Sewing chalk/thin pen (optional)
Instructions
Step 1 Measure the diameter of buttons that are on the cardigan before buying new buttons. Unless you're a skilled enough seamstress to adjust the button holes yourself, you must get buttons which will fit through the existing hole without trouble. If your buttons are an odd or awkward shape to put through a button hole (e.g. stars or teddy bears), it may be worth buying ones that are slightly smaller than the original ones. Once your new buttons arrive, or if you're able to take the cardigan to the craft shop with you, you can always check if the button would fit. In my case, although the buttons are wider than the original ones, they're also narrower, which meant that I would be able to fasten them up.
Step 2
 Remove the buttons from the cardigan. Be careful to only cut the thread and avoid cutting though the cardigan itself. As you remove the buttons, you can mark where they originally were, if you're worried that you won't be able to find that same spot again. If you do that then ensure that you use something easy to wash off (like sewing chalk) or make a mark small enough that it will be hidden under the new button (in which case most things will do). Alternatively, you can remove the old buttons and attach the new ones one by one, either whilst keeping the original thread in place or whilst still able to see/remember where the old one was placed.
Step 3
 Sew your new buttons on. This is the part where you want to take your time, especially if you're not particularly experienced at that, so sit comfortably in a well lit room and do it at your own pace. Ensure that your needle is the right thickness for the button as well as your hands, and that you're using thread in a colour matching the cardigan as closely as possible. Even if you don't sew a lot, you could get a cheap sewing kit which already comes with a variety of colours, but generally black will work on most dark colours and white – on most light ones. When sewing the buttons on, watch out for thread tangling and make sure that in the end it's attached securely, so that it will last.
Finished product

Changing the buttons on the cardigan not only gave it a more Lolita feel, but also lifted the whole thing overall. Before it seemed a bit dark, dull, a little washed out, but with the new buttons it looks almost brand new again. While in the sunlight the photo came out looking like the cardi was more pastel than it is in real life, the colours go together just as nicely, and I know that I'll get plenty of use out of this one.
Total cost of making: about £8.65 (again, the cardigan was the pricey part here).
Method 3: Dyeing
Things you will need

- Cardigan of your choice (must be made of natural fabrics)
- Washing machine-friendly dye in a colour of your choice
- Pre dye colour removed (optional)
- Washing machine (not pictured)
Instructions
Step 1 Similarly to Method 1, this is a "follow instructions on the packet" process. Every dye and dye brand will work a little differently, and ignoring their instructions may result in you damaging the cardigan or even your washing machine.
In my case, the cardigan I started out with is a rather awful shade of pale green. What I'd love to have is a rich navy one instead. When dyeing fabrics, remember that the same colour combination rules apply as everywhere else: for example, if you're trying to dye a yellow item blue, it can come out green and so on. So to make sure that I get the result I'm after, I used a pre dye product which stripped the cardigan off that horrible colour. If yours is white or offwhite, or if you're not worried about the colours mixing and creating something new and unwanted, simply proceed to the next step.

 Step 2
Now we get to the dyeing part. With Dylon there is a certain amount of dye that you need minimum per your item’s weight to achieve the full colour. However unless they're thick, heavy cardigans, one packet should be enough. So once the cardigan came out all stripped of that terrible green (except for thread around the buttonholes), I followed the instructions on the dye and whacked it back to the washing machine again.
Finished product
As you can see, I did more to this cardi than dyeing it. Nonetheless, just dyeing made a world of difference. As it turned out, I probably didn’t need the colour remover, but I’m still pleased with the result. The thread around the buttonholes wouldn’t dye because it’s nylon, so I used a permanent black marker to cover that up – if you're skilled enough then by all means use less amateur means. Hopefully that won’t run in the wash.
Total cost of making: £16.33 just for the dyeing part (Dylon's products aren't cheap, around £6.50 per dye and just under £6 for the pre dye, however, they are quality, and I didn't want to skimp on that); £19.02 including the new buttons and iron on patches.
Final tips
- Just like you do when putting together a coordinate, consider things like colours, style and how well it'd go with your wardrobe overall. As builder pieces, cardigans can be extremely versatile, but at the same time personalising them too much can lead to them matching only one dress you own or only one style.
- Take inspiration from brand. It's not copying, but this way you can get the style you want for a lot less.
- It sort of goes without saying, but keep the project appropriate to your skills level. I'm a beginner and wouldn't be able to even attempt anything so complicated as to, for example, sew on any ruffles (which is why I didn't feature anything like that here). But if you can, or know someone who can and would be willing to help, then go for it. If you're unsure, ask yourself if you'd waste something should things go wrong – i.e. would you be able to undo or fix what you messed up – before starting anything.


No comments: